July 23, 2017

Experiments in wet cyanotype - Part 6

Wet Cyanotype_Sue Reno_Image 72
 Here we go with part 6! I was so intrigued/alarmed/amused by the daisy prints I achieved in part 5 that I wanted to try more flower prints. Something substantial seemed like a good bet, so I went out in the garden and clipped a yellow gladiolus and a stargazer lily.
Wet Cyanotype_Sue Reno_Image 73
 I wanted to use the stamens, with their heavy load of pollen, just to see what would happen, but they were impossible to arrange with any sort of precision, so I clipped them. The stargazer lily flower petals are thick and substantial and lumpy, so I had to sort of smoosh everything into place with the glass cover.  Same for the gladiolus, it's got some heft. So I put these out in the early evening, with the plan that they would wilt a bit overnight before being hit by the morning sun.
Wet Cyanotype_Sue Reno_Image 74
 I did two more snakeroot prints, this time using a blossom on one of them. For all four of these, I made a slight change in procedure. I didn't wet the foam board before layering the cloth and plants. I did spritz liberally with water after arranging and before topping with glass. So to some extent the cyanotype treated fabric is masked from the moisture by the plants; however, the plants have their own moisture, and the fabric will wick. I'm curious to see if it makes a difference.

Wet Cyanotype_Sue Reno_Image 75
I pulled these after about 20 hours, when a thunderstorm threatened.  They were on the dark and murky side at this point, without a lot of  the striation I had in previous prints.

Wet Cyanotype_Sue Reno_Image 76
 They were still really wet, so I set them to dry in the dark overnight.
Wet Cyanotype_Sue Reno_Image 77

Wet Cyanotype_Sue Reno_Image 78

Wet Cyanotype_Sue Reno_Image 79
 Here's the finished, rinsed, and dried prints.
Wet Cyanotype_Sue Reno_Image 80
 They have a much softer feel than most of my previous prints.
Wet Cyanotype_Sue Reno_Image 81
 I suppose you could call them dreamy.
Wet Cyanotype_Sue Reno_Image 82
 For my purposes, I would rank them as good but not great. I prefer a harder edge and more color shifts. If I live with them for a while I may change my opinion.
Wet Cyanotype_Sue Reno_Image 83
So! This was a useful experiment. I think I get crisper prints when I wet the board before laying on the plants, and more of the color shifts I prefer if I put them in bright sunlight right at the start of the exposure. Onward and upward!

July 22, 2017

New Work in Progress - Storm Watch

 If you've been following along with my wet cyanotype experiments, you've seen some of the prints I made using this exciting, new-to-me technique. My ultimate goal when printmaking is to use them in an art quilt, so I picked out some of my favorites and set out to make a quilt.

Because one of the first sets of wet cyanotype prints had developed during and despite a summer storm, and because of the mysterious and anticipatory feel they all have, I'm naming this one Storm Watch.

I often use complex patchwork to frame my imagery, but these prints are already complex, and I wanted to keep the emphasis there, so I patched them together using simple strip work. What's decidedly not simple are the fabrics I used--all silks, many of them Mysore silks brought back from travels to India, which have a wonderful sheen and texture. Many of them are "shot" silks, woven with different colors in the warp and weft, which change in appearance depending on which angle you look at them. I also mixed in the rougher textures of raw silks and tweeds, and some selected re-purposed silk ties. It ended up medium sized by my standards, around 50" square.
 I'm only showing previews of the work at this point because the stripwork will change rather dramatically once it's quilted. I love the texture and dimension the stitching creates and that's one of the reasons I work in this medium. Quilting will also change the prints, and here I run into a design opportunity. Because more traditional cyanotypes are a very stark blue and white aesthetic, I usually use bright or contrasting threads to add color and interest, like in this detail from The Organic Landscape:
Sue Reno, The Organic Landscape, detail 4
The Organic Landscape, detail

Or this one from Japanese Anemone:
Sue Reno, Japanese Anemone, detail 1
Japanese Anemone, detail

But for these prints I want to preserve the delicacy of the imagery, so I will need a lighter touch. I'm still mulling over how to proceed.

In the meantime, a new quilt needs a new backing fabric, so it's time for another installment of "Look What I Made on my Driveway". I started with a piece of damp cotton sateen and drizzled it with diluted hot pink textile paint.

 Followed by a drizzle of green:
 And some yellow highlights:
 It was an absurdly humid day, and even after misting it with the hose the paint wasn't moving around much, so I had to get in there with a gloved hand and swirl things around a bit. After drying, rinsing, drying again, and ironing, I ended up with this:


It's very pink! Fortunately I don't harbor any color prejudices, and I think it will be the perfect back for this quilt. My art quilts are made to hang on the wall, so the back is not normally seen, but it makes me happy to have something cheerful there while I am working on it.

And finally, as I was standing on a chair to take that picture of the backing fabric, I looked down at the chair and noticed this:
Striped chair
It's pretty much the same color palette as my fabric. I had covered the chair seat with a handwoven Guatemalan fabric years ago, and it's always made me happy. It's a good reminder that it's important to surround yourself with things that resonate with your personal aesthetic, because they do end up being a subconscious influence.

As always, thanks for reading and commenting.

July 20, 2017

Experiments in wet cyanotype - Part 5

Wet Cyanotype_Sue Reno_Image 52
 It's time for more wet cyanotype fun! Here's another batch of experimental prints using the wet cyanotype method of printing on fabric. If you are new here, welcome, and feel free to look back at the explanations in Part 1, Part 2, Part 3, and Part 4. I've also added a tab to to the blog header that will give you all the relevant posts in reverse chronological order.

This time around I was working exclusively with cotton sateen that I treated myself with cyanotype solution. I spritzed a bit of water on the foam board base, added the fabric, placed the leaves, gave it another spritz, and covered it all with a sheet of glass.  I started with 'August Moon' hosta leaves, above, and an ornamental sweet potato vine, below.
Wet Cyanotype_Sue Reno_Image 53
 Below is another hosta leaf that sustained some damage, and a wood poppy leaf. For these first three the first spritz of water had a bit of dye-na-flow pink color added; the rest were all plain water.
Wet Cyanotype_Sue Reno_Image 54
 Here is a christmas fern frond. You can never have too many fern prints.
Wet Cyanotype_Sue Reno_Image 55
Up next were two daisy sprigs. Using flowers in regular cyanotype printing, where the exposure is 10 - 15 minutes, can be a bit tricky, and the delicate petals are more translucent to light than the leaves, and its hard to find the right balance. So I was curious to see what would happen with the wet cyanotype process with these.
Wet Cyanotype_Sue Reno_Image 56

Wet Cyanotype_Sue Reno_Image 57
Last up in this batch was a wonderful snake root compound leaf on a 16" x 20" panel.
Wet Cyanotype_Sue Reno_Image 58
 All of these were left outside for approximately 24 hours. The weather was sunny, hot, and very humid. After exposure, they looked like this:
Wet Cyanotype_Sue Reno_Image 59
 They were very dark and moody looking. I like taking photos as this stage because it is very transient.
Wet Cyanotype_Sue Reno_Image 60

Wet Cyanotype_Sue Reno_Image 61
 I somehow skipped taking a photo of the fern at this point, probably because I got distracted by these daisy prints:
Wet Cyanotype_Sue Reno_Image 62
 The flowers are fairly well represented, but the leaf impressions got melt-y, perhaps because of the moisture in the leaves and stems, or possibly it became a focal point for the condensation on the glass.
Wet Cyanotype_Sue Reno_Image 63
 And the snakeroot print was really dark at this point.
Wet Cyanotype_Sue Reno_Image 64
 After rinsing, drying, and ironing, here are the finished prints. Once again, I am just in love with the results this process produces. The golden mottling here is just great:
Wet Cyanotype_Sue Reno_Image 65

Wet Cyanotype_Sue Reno_Image 66
 This one is a particular favorite:
Wet Cyanotype_Sue Reno_Image 67
 And again, you can never have too many fern prints.
Wet Cyanotype_Sue Reno_Image 68

Wet Cyanotype_Sue Reno_Image 69
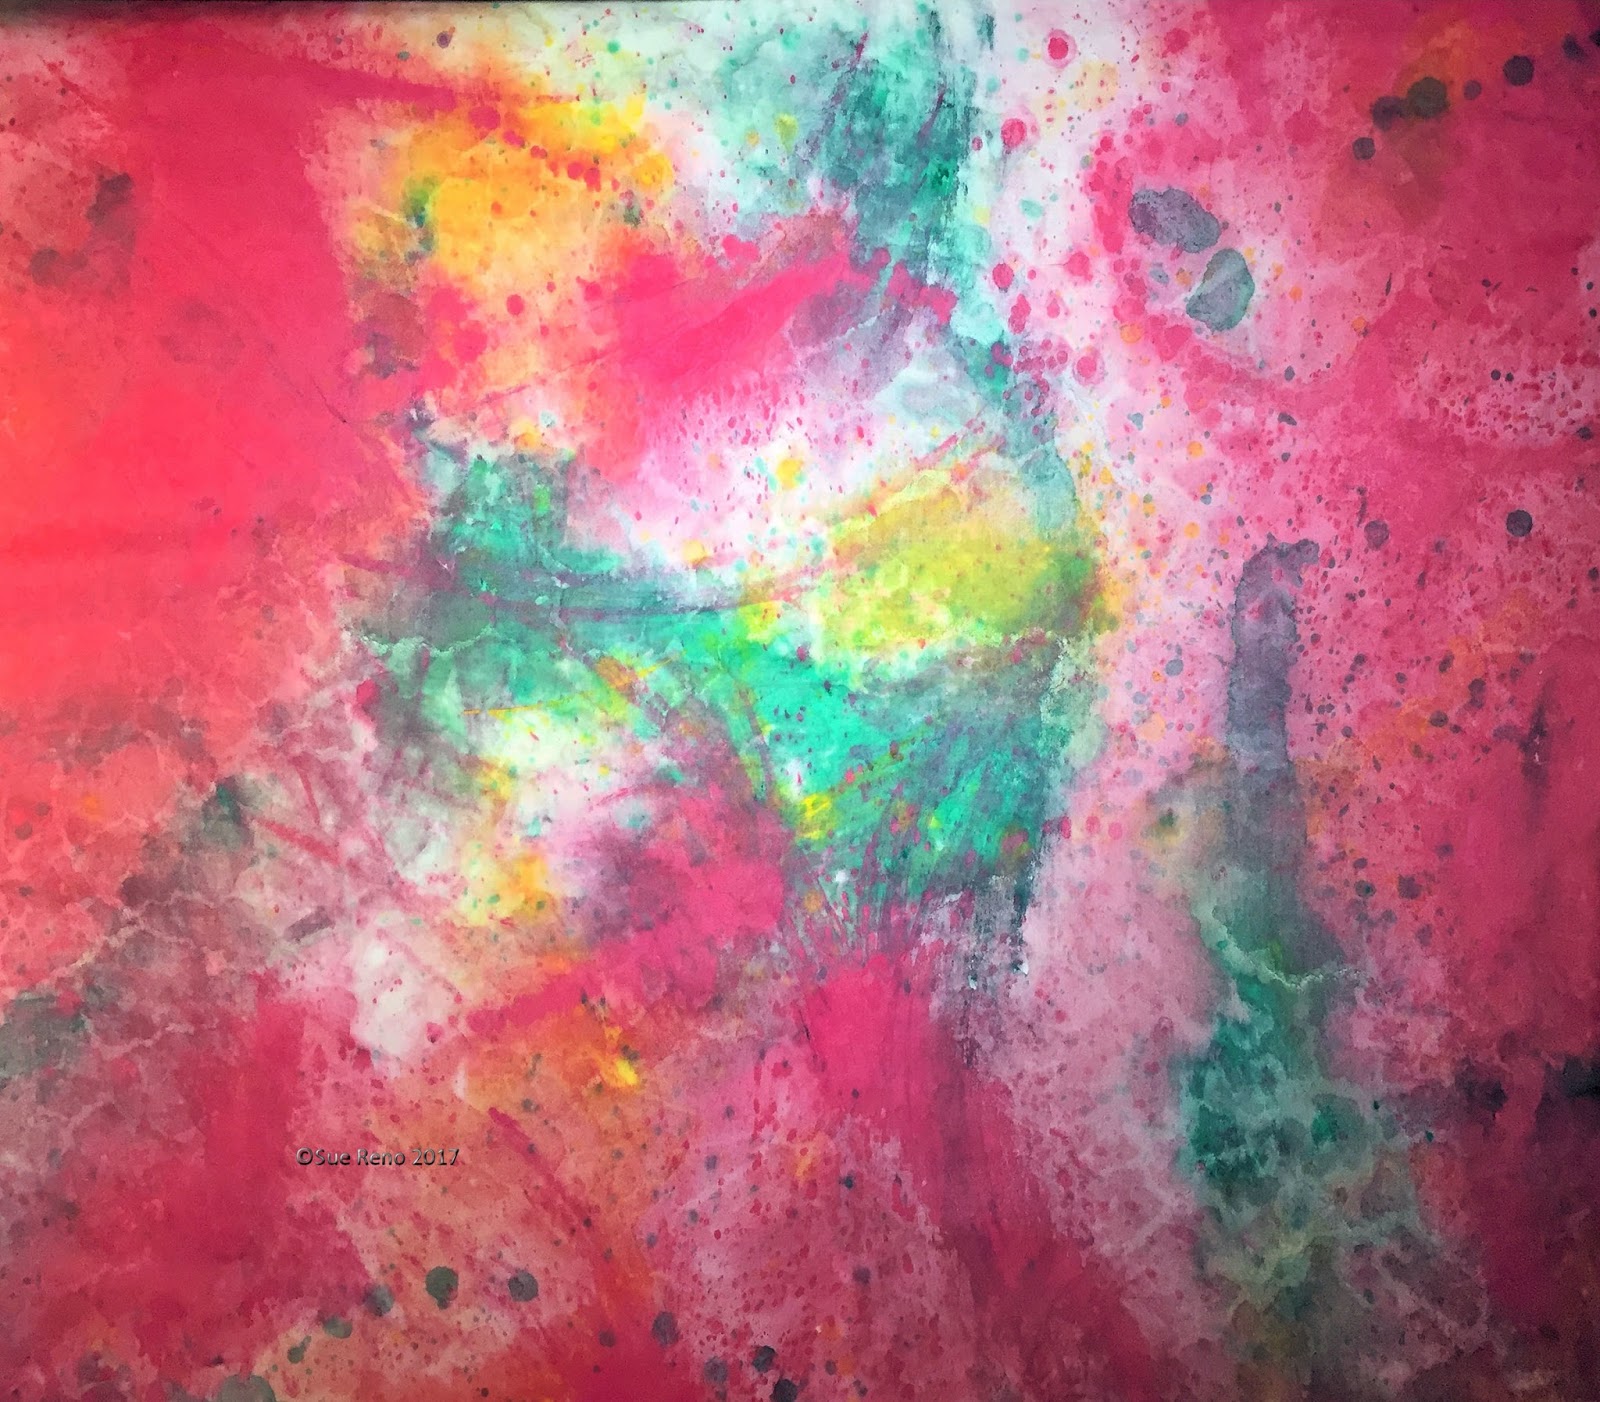
 I'm not sure how I feel about these daisy prints. They seem somewhat unsettling to me. I can see how some stitch work to define and/or enhance some of those melt-y bits and the flowers could be really effective. Or not. I'm not sure I want to invest a lot of time in them. They will go up on a design wall so I can think about them for a while.
Wet Cyanotype_Sue Reno_Image 70
 Last but not least, the snakeroot print turned out very lovely. I love the purple tones and all the shading in the leaves.
Wet Cyanotype_Sue Reno_Image 71
I took a break from the printmaking frenzy at this point because I had run out of treated fabric, and I had other things I needed to attend too. But there will be more to come....

As always, thanks for reading and commenting!

July 2022 Update: This post has been doing some numbers, so I wanted to say hello, and thank you, to everyone stopping by. I also wanted to let you know that this exploration turned into a series of 78 posts, and counting! You can easily access them, in reverse chronological order, by clicking on the Wet Cyanotype tab in the top header. I share a lot of details about what I've tried, and am always honest about the results in each post. Mixed in is the occasional post showing artquits I've made with my prints. I hope you enjoy reading my blog, learn a thing or two, and try your own hand at this very enjoyable process. 

Thanks as always for reading! You can also follow along on your platform of choice:

August 2023 Update: Still doing some numbers, still doing new experiments! I'm up to Experiments in wet cyanotype - part 83  and I continue to be grateful for all the interest and support. Here's the updated list of my socials, I'd love to have you follow along on the platform of your choice: 

July 18, 2017

Central Pennsylvania Festival of the Arts - Judging 2017

Jurors and Escorts, CPFA 2017
Last Thursday I reported for duty at the Central Pennsylvania Festival for the Arts in State College, PA, with my fellow jurors. After having picked the artists for the Sidewalk Sale (read about that process here), it was time to hit the streets and see the work in person. Each juror was assigned a volunteer escort to travel with them and keep them on track and on time.  The Sale is spread out over several streets and areas of the Penn State campus, so having an escort who knows their way around is really helpful. They are also super nice people!
Booths at CPFA
This is the one and only photo I took of the show, and it doesn't begin to do it justice. I was too busy working to focus on photography. I had 300+ booths to visit and score over the course of a long day. As requested by the show organizers, I made a point of introducing myself and chatting briefly about the work with all but a handful of the artists (I would never interrupt a sale). I also made a point of keeping my energy up and giving each artist an equal measure of my attention. My escorts helped by making sure I  had a good lunch, and by providing Penn State Berkey Creamery ice cream at just the right moment in the heat of the afternoon.

Overall I was very, very pleased with the artwork we had selected. It was a real thrill to see so much high quality work in person, and meet so many creative and incredibly hardworking artists. (You can see the full listing here.)

The next morning I dashed about in a series of thunderstorms, reviewing some of my choices and making sure my scores were as accurate as possible before turning in my score sheets. Late in the afternoon after the scores had been tabulated, the jurors met to discuss the results and decide on the prizes to be awarded. There was over $17,500 to be awarded in various categories--a huge responsibility, and one we took very seriously. This was a GREAT group of jurors and I'm very proud of the work we did.

And he we are just before the awards ceremony Saturday morning. L-R Sue RenoNaomi Cleary, Patricia Bellan-Gillen, Jim Bové, and Jay Gould.  It was so much fun to see the artists receive their awards, and an honor to be a part of this artist community. 


CPFA Jurors at Awards Ceremony, Allen St.

July 11, 2017

Experiments in wet cyanotype - Part 4

Wet cyanotype, Sue Reno, Image 40
By now I was really in the groove for making wet cyanotype prints. Experiments to this point helped me dial in a process that produced prints with an aesthetic that I wanted, while still having the thrill of unpredictability.
Wet cyanotype, Sue Reno, Image 41
You can read about the process to date in Part 1, Part 2, and Part 3. And I've added a Wet Cyanotype tab to the top header where you can always access all the relevant posts in reverse chronological order.
Wet cyanotype, Sue Reno, Image 42
For this round of prints, I again used my heavily treated cotton sateen. I sprayed a fine mist of water on the foam board support, layered on the fabric and leaves, gave it another light misting, then added the glass cover. The leaves were full of sap, and the weather was hot, humid and sunny.
Wet cyanotype, Sue Reno, Image 43
I used plume poppy leaves for the larger 16" x 20" print, and wood poppy leaves for the other three smaller prints. I left them to expose for about 24 hrs.

Wet cyanotype, Sue Reno, Image 44
Here they are after exposure.
Wet cyanotype, Sue Reno, Image 45
Again, after removing the glass and the leaves, I let them finish drying off in a dark, air conditioned room.  They are very dark and mysterious at this point.
Wet cyanotype, Sue Reno, Image 46

Wet cyanotype, Sue Reno, Image 47
Here are the finished prints. 
Wet cyanotype, Sue Reno, Image 48
I thought the patterning of the gold and orange bits was particularly nice with this round.
Wet cyanotype, Sue Reno, Image 49
I also loved the blue and purple shading withing the leaf impressions, and the way some of the leaf veining shows up.
Wet cyanotype, Sue Reno, Image 50

Obviously, I needed to make more and more and more.....

As always, thanks for reading and commenting.