December 26, 2017

New Work - Storm Watch

Storm Watch by Sue Reno
Storm Watch
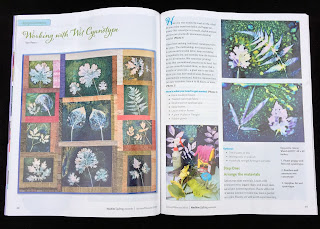
 I am happy to share with you my latest work, Storm Watch. It's an art quilt utilizing some of the wet cyanotype prints I made while experimenting this summer. I've been keeping it under wraps, but now it's made its debut in the pages of Machine Quilting Unlimited, the Jan.-Feb. 2018 issue, as part of my article Working With Wet Cyanotype.
Storm Watch by Sue Reno, detail 1
Storm Watch, detail 1
 These prints were fun and addictive to make. I worked with plants I grow in my gardens, arranging them spontaneously on cotton sateen treated with cyanotype chemicals, and leaving them out for long exposures. The results were often surprising and always delightful. The weather was generally very hot and humid and unsettled; I even had a batch that was caught in a summer thunderstorm and actually improved by it.
Storm Watch by Sue Reno, detail 2
Storm Watch, detail 2
 So I used the meteorological theme of "storm watch" when picking out colors and designing the quilt.
Storm Watch by Sue Reno, detail 3
Storm Watch, detail 3
 The prints are quilted along the leaf veins, then surrounded with heavy pebbling that suggests rain or hail.
Storm Watch by Sue Reno, detail 4
Storm Watch, detail 4
 The sashings are all silks, of various textures and weights, and are quilted in my improvisational variation of a Greek key motif.  The quilt finished out at 49" x 49".
Storm Watch by Sue Reno, detail 5
Storm Watch, detail 5
This is an exciting new direction for my work, and I hope you enjoy viewing it as much as I enjoyed making it.
Storm Watch by Sue Reno, detail 6
Storm Watch, detail 6
If you are new here, welcome! I've been detailing and documenting my experiments with wet cyanotype in great detail; you can read it in reverse chronological order by clicking the Wet Cyanotype tab in the top header, or click here.

And a reminder that I also post on social media:
Facebook page:http://www.facebook.com/suerenostudio
Twitter feed: http://twitter.com/suereno
Tumblr: http://suerenostudio.tumblr.com
Instagram: https://www.instagram.com/sue_reno_studio/

Wet Cyanotype article in MQU

 I am thrilled and honored to share that my wet cyanotype work is currently featured in Machine Quilting Unlimited, the Jan.-Feb. 2018 edition. The article is Working with Wet Cyanotype, and is a 6 1/2 page, 18 photo step-by-step tutorial on the process. It includes prints I did specifically for the article (not shared on social media) and the debut of my latest quilt, Storm Watch.

If you've been following my blog over the past 6 months or so, you know how much fun I had experimenting with this technique that breaks all the rules of traditional cyanotype printmaking. In this article I give you concise, simple directions so you can play around with wet cyan and make your own amazing prints.

But wait, there's more! MQU is a consistently great publication, and this issue is no exception. There's a LOT of good information here, and you really should get your own copy. It's available at Barnes and Noble, online, or by subscription.

December 23, 2017

Experiments in wet cyanotype - part 16

Wet cyanotype_Sue Reno_Image 245
 Another round of prints made in the deepest, darkest days around the winter solstice, proving that wet cyanotype printing is not just a summer fling. These were started on a sunny day where the temperature flirted with 50F. A month ago I had preserved some sweet gum leaves by soaking them in a glycerin solution. They weren't pretty, but they were intact and flexible, and I was curious to see how they would print. Above is a preserved leaf, on treated cotton sateen, at the beginning of the process with some soda solution sprayed around the edges. Below is another sweet gum leaf with two alpine strawberry leaves fresh from the garden, also with soda ash.
Wet cyanotype_Sue Reno_Image 246
 We've had snow and hard freezes, but alpine strawberries are remarkable resilient little plants.
Wet cyanotype_Sue Reno_Image 247
 Also still intact in the garden were these meadowsweet fronds. I don't think I've every printed with them before, but I have high hopes. They are very fern-like in their structure.
Wet cyanotype_Sue Reno_Image 248
 Speaking of ferns, here's a frond from the aptly named Christmas fern, which will stay green most of the winter, along with a purple heuchera leaf.
Wet cyanotype_Sue Reno_Image 249
 I finished out this batch with another preserved sweetgum leaf, this time on treated soil noil. The silk has a natural water resistance that tends to repel the cyanotype solution as I'm painting it on. Sometimes I double-coat it, but here I left it slightly splotchy.
Wet cyanotype_Sue Reno_Image 250
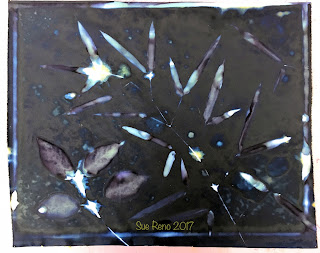
 I left the prints out to expose for about 24 hours. The temperature dropped into the 30's overnight but didn't go below freezing. Here are the prints with the leaves removed, before rinsing. As with the other prints I've made in late fall, they tend towards the dark and mysterious.
Wet cyanotype_Sue Reno_Image 251

Wet cyanotype_Sue Reno_Image 252
 I know from experience that the beautiful leaf veining I see here will probably rinse out, so it's good to preserve it digitally.
Wet cyanotype_Sue Reno_Image 253

Wet cyanotype_Sue Reno_Image 254

Wet cyanotype_Sue Reno_Image 255
 Lots of good splotchiness in the silk noil print.
Wet cyanotype_Sue Reno_Image 256
 Here are the finished prints. They look very wintery, don't they?
Wet cyanotype_Sue Reno_Image 257
 All photos enlarge when clicked.
Wet cyanotype_Sue Reno_Image 258
 They look like they are caught in a snow storm.
Wet cyanotype_Sue Reno_Image 259
There's lots of good detail in the meadowsweet print.
Wet cyanotype_Sue Reno_Image 260

Wet cyanotype_Sue Reno_Image 261
I wish I could better capture the texture on this silk noil print. All those speckles correspond to a bit of nubby texture.
Wet cyanotype_Sue Reno_Image 262
All in all, a good batch of prints and I'm happy I put in the effort to capture what's going on in the garden even when all seems dark and cold.

If you are new here, welcome! I've been detailing and documenting my experiments with wet cyanotype in great detail; you can read it in reverse chronological order by clicking the Wet Cyanotype tab in the top header, or click here.

And a reminder that I also post on social media:
Facebook page:http://www.facebook.com/suerenostudio
Twitter feed: http://twitter.com/suereno
Tumblr: http://suerenostudio.tumblr.com
Instagram: https://www.instagram.com/sue_reno_studio/

December 5, 2017

Experiments in wet cyanotype - part 15

Wet cyanotype_Sue Reno_Image 227
With the last few days of moderate weather on the horizon, I went foraging in my yard once again for scraps of leaves to use in yet another round of wet cyanotype printing. I clipped some bamboo and a viburnum twig, above, and sweetgum, comfrey, and viburnum leaves, below.
Wet cyanotype_Sue Reno_Image 228
The prints are on cotton sateen that I treated with cyanotype chemicals. Below are alpine strawberry leaves.
Wet cyanotype_Sue Reno_Image 229
I used a bit of diluted washing soda sprayed around the edges of the cloth, before spraying the whole surface with plain water. Below you see the washing soda starting to work on changing the pH and breaking down the chemicals. The leaves are garlic mustard, an invasive nuisance, but one that's very handy for my current purposes as it sets new leaves in the late fall.
Wet cyanotype_Sue Reno_Image 230
I put the prints out in bright sunlight for the short daylight hours. That night there was a hard freeze and the under surface of the glass covers got frosty. The bamboo print was the most dramatic:
Wet cyanotype_Sue Reno_Image 231
(All images enlarge when clicked.)
Wet cyanotype_Sue Reno_Image 232
 The other ones looked pretty cool as well.
Wet cyanotype_Sue Reno_Image 233

Wet cyanotype_Sue Reno_Image 234
 I brought them in at dusk on the second day. Again, these late season prints are not as dramatic and colorful as the ones from high summer, but they are still fascinating. Here are the un-rinsed prints:
Wet cyanotype_Sue Reno_Image 235

Wet cyanotype_Sue Reno_Image 236
 Lots of dark mysterious colors.
Wet cyanotype_Sue Reno_Image 237
 The garlic mustard print looked amazing at this stage. I love the orange in the corners, but most of all I love that some of the delicate and intricate leaf patterning transferred to the print.
Wet cyanotype_Sue Reno_Image 238
 I have no way of knowing for sure, because there isn't a control in this experiment, but I suspect that the hard freeze added to this effect. This is just beautiful! A lot of the patterning inside the leaf shapes typically rinses out, because it hasn't been directly exposed to the UV rays of the sun, so I'm glad I take pictures and document this ephemeral stage.
Wet cyanotype_Sue Reno_Image 239
 And here are the finished prints:
Wet cyanotype_Sue Reno_Image 240
 Once again, I'm very happy with the results. I never quite know what I'm going to get with this process, but it's almost always interesting.
Wet cyanotype_Sue Reno_Image 241
 These alpine strawberry leaves are going to look great with some added stitching.
Wet cyanotype_Sue Reno_Image 242
 Best of all, a bit of the patterning remained in the garlic mustard prints.
Wet cyanotype_Sue Reno_Image 243
 Here's a detail. It's so pretty!
Wet cyanotype_Sue Reno_Image 244
Now I really want to try another frozen exposure.

If you are new here, welcome! I've been detailing and documenting my experiments with wet cyanotype in great detail; you can read it in reverse chronological order by clicking the Wet Cyanotype tab in the top header, or click here.

And a reminder that I also post on social media:
Facebook page:http://www.facebook.com/suerenostudio
Twitter feed: http://twitter.com/suereno
Tumblr: http://suerenostudio.tumblr.com
Instagram: https://www.instagram.com/sue_reno_studio/

December 4, 2017

Experiments in wet cyanotype - part 14

Wet cyanotype_Sue Reno_Image 204
Once again, I had packed away my supplies, but the weather remained mild, and my obsession with and curiosity about the wet cyanotype process remains dialed up to 11, so here we are again. There  had been mild frosts, but no hard freeze, so there were still some scraps of leaves about. I had a warmish, sunny day on tap, but no treated fabric on hand. I realized I could experiment with really putting the "wet" in wet cyanotype, and start with fabric freshly painted with the cyanotype chemicals. I started with a 16" x 20" piece of cotton sateen and some sweetgum leaves, wood poppy leaves, and a christmas fern frond. I was gratified to see that the reaction began immediately upon exposure.
Wet cyanotype_Sue Reno_Image 205
Next I tried a 10" x 12" exposure of a sweetgum leaf:
Wet cyanotype_Sue Reno_Image 206
It also colored up right away:
Wet cyanotype_Sue Reno_Image 207
So I added a wood poppy/sweetgum print:
Wet cyanotype_Sue Reno_Image 208
A wood poppy/damaged pulmonaria leaf/holly fern:
Wet cyanotype_Sue Reno_Image 209
Some golden raspberry leaves:
Wet cyanotype_Sue Reno_Image 210
and wood poppy with big root geranium:
Wet cyanotype_Sue Reno_Image 211
The first four were set out on my deck with indirect sunlight, but the last two I set in the driveway in the direct sun. The immediate reaction was this lovely rich teal color:
Wet cyanotype_Sue Reno_Image 212
I like to leave prints out for 24 hours if possible, because overnight the moisture condenses on the glass and adds to the movement of the chemicals on the fabric. On this night the temperature dipped below freezing, and two of the prints which were up on a table got a bit frosty.
Wet cyanotype_Sue Reno_Image 213
It was exciting but (spoiler alert) didn't seem to change the resulting print in any significant way.
Wet cyanotype_Sue Reno_Image 214
Here are the finished, dried, but un-rinsed prints:
Wet cyanotype_Sue Reno_Image 215

Wet cyanotype_Sue Reno_Image 217
There's lots of deep, dark color in the background, and very subtle color shifting.
Wet cyanotype_Sue Reno_Image 217

Wet cyanotype_Sue Reno_Image 218
The two that got direct bright sun immediately upon exposure also got a bit splotchy.
Wet cyanotype_Sue Reno_Image 219


Wet cyanotype_Sue Reno_Image 220
Here are the finished prints. I think they are quite lovely. You can click on any image to enlarge it.
Wet cyanotype_Sue Reno_Image 221
There is a lot of contrast in this batch. The masked, unexposed areas under the leaves are very bright and white.
Wet cyanotype_Sue Reno_Image 222
I think because the fabric was freshly treated, the chemicals in the wet areas under the leaves wicked out into the rest of the print, something like when I make a heliographic print with textile paints.
Wet cyanotype_Sue Reno_Image 223

Wet cyanotype_Sue Reno_Image 224

Wet cyanotype_Sue Reno_Image 225
In general I think I prefer the results from pre-treated, dried fabric, but this is a good trick to have in my arsenal and I'm quite happy with the results.

Wet cyanotype_Sue Reno_Image 226

If you are new here, welcome! I've been detailing and documenting my experiments with wet cyanotype in great detail; you can read it in reverse chronological order by clicking the Wet Cyanotype tab in the top header, or click here.

And a reminder that I also post on social media:
Facebook page:http://www.facebook.com/suerenostudio
Twitter feed: http://twitter.com/suereno
Tumblr: http://suerenostudio.tumblr.com
Instagram: https://www.instagram.com/sue_reno_studio/