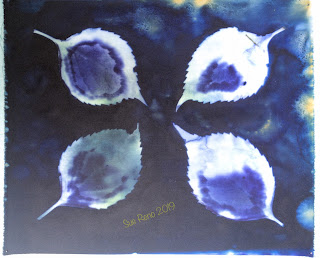
More wet cyanotype antics from back in September, as I continued to explore my new environment and break in my new studio space. The subject in these first two, however, is an old friend. Pokeweed, Phytolacca americana, was the subject of the first cyanotype print I ever made, back in 2002. I turned it into an art quilt that I am as happy with today as the day I finished it. It's bordered in Mysore silks.
One of the lovely things about this plant is the beautiful color that the berries give off. You can see it starting to spread as this print was exposing under glass in full sunlight. Unfortunately, the color is fugitive, so I appreciate its fleeting glory.
I also did a few prints from a peony plant that came with the landscaping.
Here are the exposed, unrinsed prints.
These give me a thrill every time, both for their dark beauty and for the preview of the final prints.
That lovely green color is from the unexposed cyanotype chemicals and will rinse out.
Here are the finished prints.
Lots of fun swirly stuff happening here.
These will look great in their ultimate form with stitched leaf veining.
If you are new here, I've been working with cyanotype since 2002, and with the wet cyanotype process since the summer of 2017. All the wet cyan posts, of which this is number 44, where I document my experiments in detail, are available in reverse chronological order by clicking the "Wet Cyanotype" tab in the header bar, or by going here.
And a reminder that you can also follow along on your social media of choice:
Facebook page:http://www.facebook.com/suerenostudio
Twitter feed: http://twitter.com/suereno
Tumblr: http://suerenostudio.tumblr.com
Instagram: https://www.instagram.com/sue_reno_studio/
December 17, 2019
December 2, 2019
Experiments in wet cyanotype - part 43
I'm catching up with posting about the wet cyanotype prints I made this fall. I had some good printmaking sessions, figuring out how to arrange things in my new studio, and exploring my immediate environment.
This batch of prints was done mid-September, on cotton sateen that I treated with the cyanotype chemicals. At top are some hydrangea leaves, followed by a peony stem.
After laying leaves on the treated fabric, I sprayed them with water, covered them with glass, and set the out to expose in direct sunlight for about 6 hours. I didn't use any other chemicals or colors on them this time around. Above and below are some burdock leaves.
Here is a sprig of milkweed. Ordinarily I would not disturb milkweed, as it's an important plant for insect life, but this one was growing up in a neglected part of the garden, and had to go so I could clean up some shrubbery.
The burdock leaves have a nice halo effect going on.
On the milkweed print, I got the ephemeral and highly desirable aurora effect.
Here are the finished prints. Nothing too exotic, but good solid interesting images.
The halos held up in the burdock prints.
The milkweed print is quite beautiful and fully justifies sacrificing the plant.
If you are new here, I've been working with cyanotype since 2002, and with the wet cyanotype process since the summer of 2017. All the wet cyan posts, of which this is number 43, where I document my experiments in detail, are available in reverse chronological order by clicking the "Wet Cyanotype" tab in the header bar, or by going here.
And a reminder that you can also follow along on your social media of choice:
Facebook page:http://www.facebook.com/suerenostudio
Twitter feed: http://twitter.com/suereno
Tumblr: http://suerenostudio.tumblr.com
Instagram: https://www.instagram.com/sue_reno_studio/
This batch of prints was done mid-September, on cotton sateen that I treated with the cyanotype chemicals. At top are some hydrangea leaves, followed by a peony stem.
After laying leaves on the treated fabric, I sprayed them with water, covered them with glass, and set the out to expose in direct sunlight for about 6 hours. I didn't use any other chemicals or colors on them this time around. Above and below are some burdock leaves.
Here is a sprig of milkweed. Ordinarily I would not disturb milkweed, as it's an important plant for insect life, but this one was growing up in a neglected part of the garden, and had to go so I could clean up some shrubbery.
Here are the prints after exposure but before being rinsed. The more tender parts of the hydrangea let some light through in the long, bright exposure.
I've learned from experience that those lovely greenish tones will disappear with the rinse-out, so it's good to capture them in this stage.The burdock leaves have a nice halo effect going on.
On the milkweed print, I got the ephemeral and highly desirable aurora effect.
Here are the finished prints. Nothing too exotic, but good solid interesting images.
The halos held up in the burdock prints.
The milkweed print is quite beautiful and fully justifies sacrificing the plant.
If you are new here, I've been working with cyanotype since 2002, and with the wet cyanotype process since the summer of 2017. All the wet cyan posts, of which this is number 43, where I document my experiments in detail, are available in reverse chronological order by clicking the "Wet Cyanotype" tab in the header bar, or by going here.
And a reminder that you can also follow along on your social media of choice:
Facebook page:http://www.facebook.com/suerenostudio
Twitter feed: http://twitter.com/suereno
Tumblr: http://suerenostudio.tumblr.com
Instagram: https://www.instagram.com/sue_reno_studio/
Subscribe to:
Comments (Atom)


